Saying "Thank You" to the NHS, using Clojure
(a.k.a how to generate a static site using Clojure)
As many of you are no doubt aware, during these troubling times many young people are showing their support for the NHS and other key workers by displaying paintings of rainbows in their windows . Since I’m supposedly a grown-up, I thought I’d try to go one better - displaying a computer-generated rainbow. Naturally, I turned to Clojure to do this. My basic plan was this:
- Use Clojure to generate an HTML page, containing an SVG rainbow
- Host this HTML page on Netlify
- Display the site on a monitor using a Raspberry Pi
In this post, I’ll cover how I built and deployed my simple static site. If you’d like to follow along, clone my repo at https://github.com/DaveWM/thank-you-nhs .
Step 1: Generating the HTML
Generating HTML in Clojure is dead easy, thanks to the excellent Hiccup
library. Hiccup allows you to take a Clojure data structure, like [:span "Hello!"], and turn it into an HTML string. Our task is then to write a Clojure function that returns hiccup representing an SVG rainbow. This SVG is composed of multiple concentic circle, one for each colour of the rainbow, plus a mask
to “cut out” the section under the arch. The Clojure code looks like this:
(def rainbow
  (let [colours ["red" "orange" "yellow" "green" "blue" "indigo" "violet"]
        ;; (Richard of York gave battle in vain)
        viewbox-width 100
        ;; the rainbow is a semicircle, so we need our SVG to be in a 2:1 ratio
        viewbox-height (/ viewbox-width 2)
        ;; this is the height of the arch - try setting it to different values
        arch-height 25
        ;; the width of a single colour band
        ;; equal to the difference between viewbox height and the arch height, divided by the number of colours
        band-width (/ (- viewbox-height arch-height) (count colours))]
    [:svg
     {:viewBox (str "0 0 " viewbox-width " " viewbox-height)
      :preserveAspectRatio "xMidYMax slice"
      :width "auto"}
     [:defs
      ;; This mask cuts out a hole in the rainbow, for the bit underneath the arch
      [:mask {:id "arch"}
       [:rect {:width "100%" :height "100%" :fill "white"}]
       ;; note - SVG coordinates are upside down (y = 0 is at the top), so "viewbox-height" is at the bottom
       [:circle {:cx viewbox-height :cy viewbox-height :r arch-height :fill "black"}]]]
     [:g {:mask "url(#arch)"}
      (->> colours
           (map-indexed
            (fn [idx colour]
              [:circle {:cx (/ viewbox-width 2)             ;; this is the horizontal centre
                        :cy viewbox-height
                        ;; start with the largest band (red), and make each successive colour circle smaller by "band-width"
                        :r (- viewbox-height (* band-width idx))
                        :fill colour}])))]]))
This generates hiccup which compiles to the following HTML:
<svg preserveAspectRatio="xMidYMax slice" viewBox="0 0 100 50" width="auto">
    <defs>
        <mask id="arch">
            <rect fill="white" height="100%" width="100%"></rect>
            <circle cx="50" cy="50" fill="black" r="25"></circle>
        </mask>
    </defs>
    <g mask="url(#arch)">
        <circle cx="50" cy="50" fill="red" r="50"></circle>
        <circle cx="50" cy="50" fill="orange" r="46.42857"></circle>
        <circle cx="50" cy="50" fill="yellow" r="42.857143"></circle>
        <circle cx="50" cy="50" fill="green" r="39.285713"></circle>
        <circle cx="50" cy="50" fill="blue" r="35.714287"></circle>
        <circle cx="50" cy="50" fill="indigo" r="32.142857"></circle>
        <circle cx="50" cy="50" fill="violet" r="28.571428"></circle>
    </g>
</svg>
Which looks like this:

Great! Now we just have to create some hiccup for the entire page, which contains the rainbow SVG. Here’s a slightly simplified version of the code (full code here ):
(def page
  [:html
   [:body
    [:div.main
     [:h1 "Thank you NHS!"]
     [:div.rainbow rainbow]]]])
Now we just have to render the HTML, and spit it out to a file:
(defn main [& args]
  (->> (h/html page) ;; convert our Hiccup to a string
       (spit "public/index.html") ;; spit the string out to an HTML file
 )
Note: in our project.clj we have the line :main thank-you-nhs.core/main, which tells lein run to run this main function.
That’s all we need! If you’re following along, create a GitHub, GitLab or BitBucket repo, and push the code to it. We’re now ready to get our site set up in Netlify.
Step 2: Hosting in Netlify
Netlify
is an absolutely fantastic platform for building and hosting static sites or SPAs. It makes it extremely quick to get a site up and running. We want Netlify to watch your git repo, and on every new commit run lein run then host the /public directory as a website. If you’re following along and you’d like to give this a go yourself, follow these steps:
- Sign up on Netlify
- Create a new site from your repo
- That’s all! Netlify will build and deploy the site and give you a URL for it
“How did Netlify know what to do?” I hear you ask. The magic lies in the netlify.toml file in the root of the repo. This gives Netlify a command to run to build your site. The file looks something like this:
[build]
  command = "lein run"
  publish = "public"
Pretty easy! You can find my site at https://relaxed-bartik-f774e5.netlify.app/ .
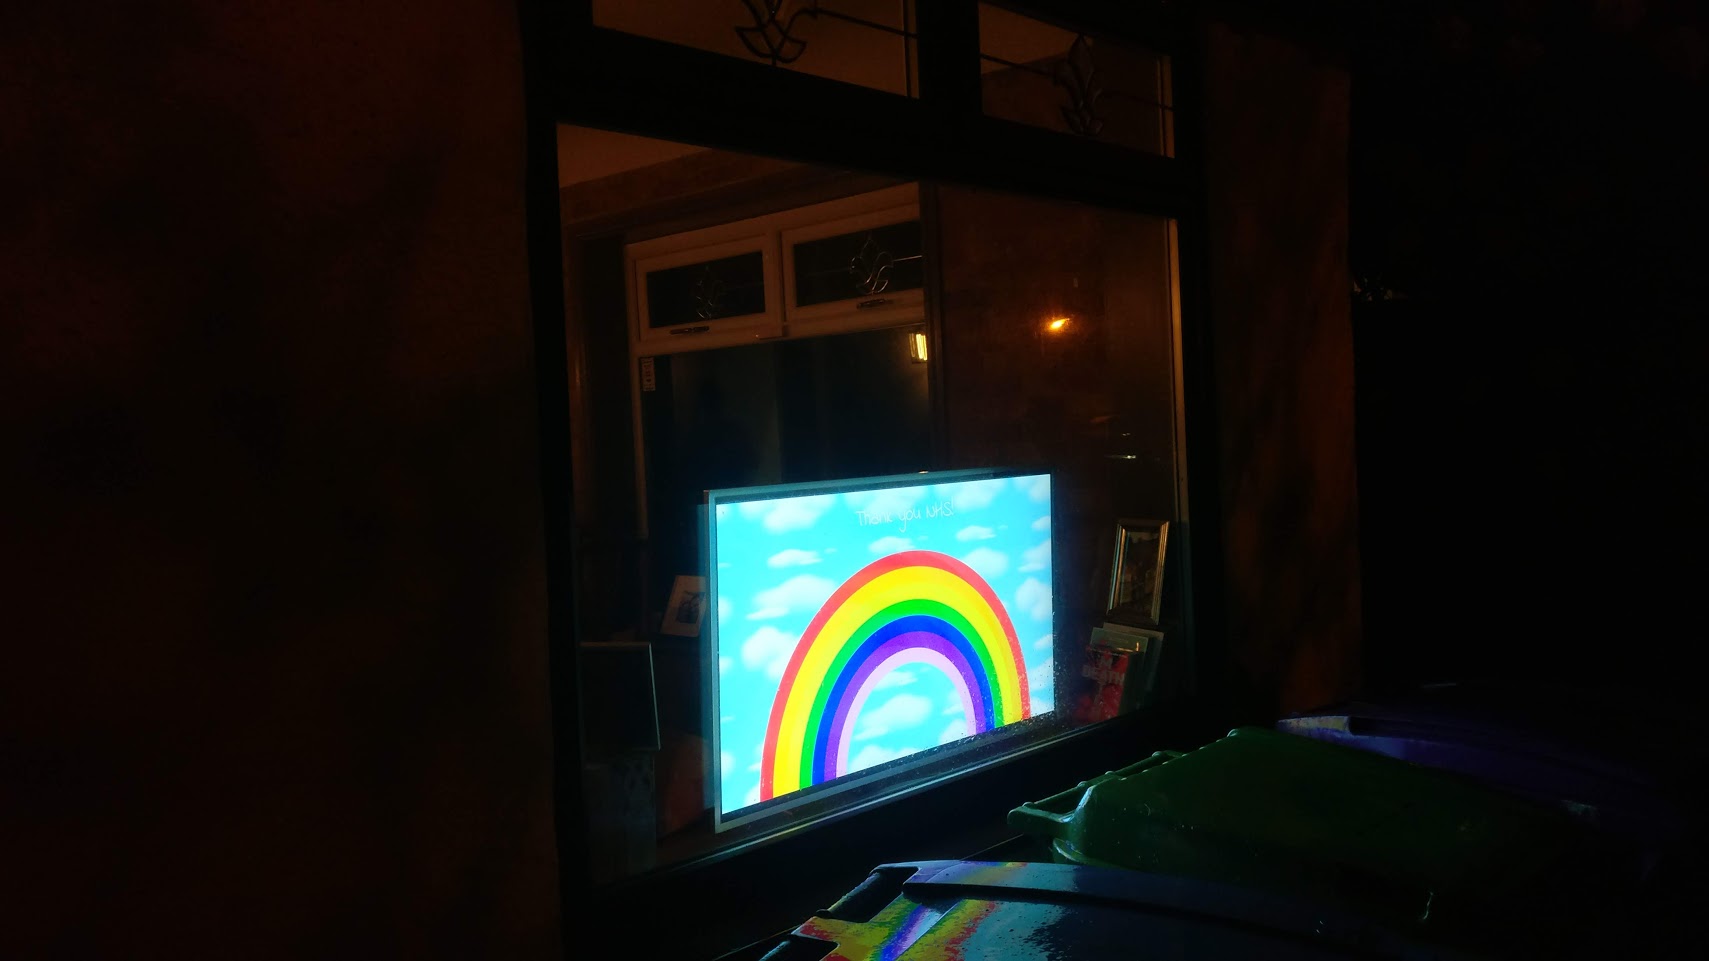
Step 3: Displaying the site
To display the site, I dug out an old Raspberry Pi, and hooked it up to a monitor. I then pointed the Pi’s browser at my site and made it full screen. Here’s the result:
So that’s how to set up a simple static site using Clojure! If you’d like to learn more, or build a more advanced static site, I’d recommend checking out the Statis library. Yu can also check out another static site I made here . Thanks for reading.
P.S. If you’d like to do something to help the NHS in this time of crisis, you can donate to the “Clap for Carers” campaign here .